
When shoppers browse an online store, the product photo is almost always the first thing they notice — often before they read a single word of the description. A clear, well-lit image builds immediate trust, while a blurry or poorly framed shot sends buyers scrolling past, no matter how good the product actually is. In ecommerce, your images are doing the selling before your copy even gets a chance.
The good news is that producing professional-looking product photos does not require an expensive camera, a studio rental, or a professional photographer on call. With the right approach, a smartphone, a clean background, and some basic planning can produce images good enough for any marketplace or online store. What matters most is understanding the principles behind compelling product photography — and applying them consistently.
This guide walks through simple, repeatable tips that any seller can use today. Whether you list on a marketplace, run your own brand store, or sell through social commerce, these techniques will help your listings look more trustworthy, more clickable, and more conversion-ready — without breaking your budget.
Start With Clean, Consistent Lighting
Lighting is the single most important variable in product photography. Poor lighting creates shadows, unnatural color, and flat images that fail to show the product clearly. Good lighting reveals texture, shape, and detail in a way that makes shoppers feel confident about what they are buying before they ever click Add to Cart.
Natural Light Is Free and Effective
One of the easiest starting points for new sellers is natural daylight. A window facing away from direct sun provides soft, diffused light that is flattering for most products. Set up your shooting surface near this window and shoot during morning or midday hours when light is brightest and most consistent. Avoid shooting in direct sunlight, which creates hard shadows and blown-out highlights that flatten product detail.
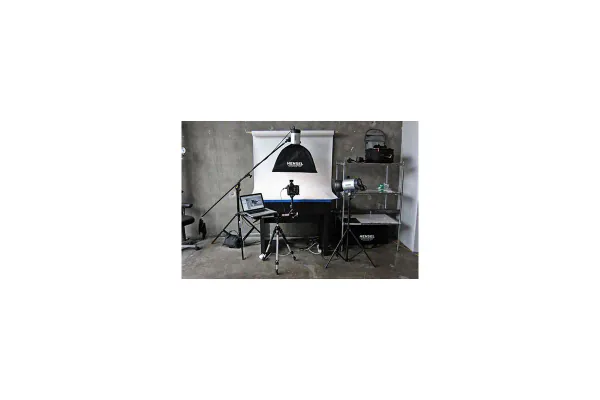
Simple Artificial Light Setups for Consistent Results
Natural light changes throughout the day and across seasons, making it difficult to keep catalog images consistent. If you photograph products frequently, a basic LED light panel or ring light offers controllable, repeatable lighting you can rely on at any hour. A two-light setup — one main light and one fill light — reduces shadows and provides even coverage across the entire product surface.
- Place the main light at a 45-degree angle to the product for natural depth
- Use a fill light on the opposite side to soften shadows without eliminating them entirely
- Choose daylight-balanced bulbs around 5500K for accurate color reproduction
- Diffuse harsh lights with a sheet of white paper or a simple softbox attachment
Keeping Lighting Consistent Across Your Catalog
Consistency matters more than perfection. Shoppers browsing a store expect images to feel unified. If half your products are shot in warm afternoon light and the other half under cool artificial light, the catalog looks disjointed and amateurish. Lock in one lighting setup and stick to it for every product you photograph, even if that means waiting for a consistent time of day when using natural light.
Use Simple Backgrounds That Keep Attention on the Product
A cluttered or distracting background is one of the fastest ways to undermine an otherwise strong product photo. The background should support the product, not compete with it. Every unnecessary element in the frame gives the buyer one more thing to look at instead of the item they are considering purchasing.
When to Use a White Background
White backgrounds are the standard for most marketplace listings. They eliminate distraction, load quickly on mobile screens, and meet the primary image requirements for major platforms. You do not need a professional lightbox — a large sheet of white card stock, a clean white wall, or a white foam board from a stationery store all work well as a starting point.
- Keeps the buyer’s focus entirely on the product
- Creates a clean, professional look that works across any catalog category
- Easier to edit and clean up in post-processing if needed
- Required by many marketplace platforms as the primary listing image
When a Lifestyle Background Adds Value
For products that benefit from context — home décor, apparel, kitchen items, fitness gear — a lifestyle image can help buyers visualize using the product in their own lives. A lifestyle shot placed as a secondary image, after the clean main shot, increases emotional engagement and helps buyers picture ownership. Keep lifestyle backgrounds simple: a wooden table, a neutral-colored wall, or a styled surface with very minimal props. If the background has too many elements, buyers start reading the scene instead of evaluating the product.
The Rule About Clutter
Remove everything from the frame that does not contribute directly to understanding or desiring the product. Every distraction is a reason to hesitate. A clean background signals professionalism and shows that the product is the priority — not the seller’s staging ability.
Show the Product From Angles Shoppers Actually Need
A single front-facing photo rarely gives buyers enough information to feel confident making a purchase. Multi-angle images reduce uncertainty and lower the risk of returns by showing exactly what the buyer is getting before money changes hands. Think of your image set as a visual answer to every question a buyer might have about the physical object.
The Essential Shot List for Every Product
- Front view — the hero shot used as the primary listing image
- Back view — important for packaging details, labels, and rear features
- Side view — shows depth, thickness, or profile shape that front views miss
- Top-down view — useful for flat products, dishes, and accessories
- Close-up detail — highlights textures, stitching, materials, or fine features
- Scale reference — shows the product next to a familiar object or modeled in use
- Packaging shot — shows what arrives in the box, which reduces buyer anxiety
Angle Strategy by Product Category
Different product types need different emphasis in their shot selection. Tailoring your angles to your category means buyers get the information they actually need rather than a generic set of views.
- Apparel and accessories: front, back, flat lay, and close-up of material or hardware
- Electronics: front, back, ports and buttons, and an in-use or connected shot
- Home goods: multiple styled angles plus a scale reference to show size accurately
- Beauty products: front label, open cap, and a texture or application close-up
- Food or supplements: front label, ingredients panel, and product displayed out of packaging
Buyers who can see exactly what they are getting ask fewer questions, leave fewer negative reviews, and return products less often. That outcome alone makes a complete angle set worth the extra time invested during every shoot.
Style and Prepare Every Item Before Shooting
Even a good camera setup cannot fix a product that looks unprepared in the frame. Styling and prepping each item before the shoot is a small step that makes a significant and immediately visible difference in the final images. Professional results come from preparation more than from expensive equipment.
Physical Preparation
- Wipe down products to remove fingerprints, dust, and smudges before shooting
- Steam or iron fabric items to remove wrinkles and folds that look twice as obvious on camera
- Assemble any pieces that are meant to be shown assembled in the listing
- Remove price stickers, shipping labels, or tags that should not appear in listing images
- Check for dents, scratches, or surface marks — swap out damaged units before the shoot
Arranging Packaging
If the product comes in branded packaging, consider whether showing the box adds perceived value to the listing. For many categories — beauty, electronics, food, and gifts — the packaging itself signals quality and builds buyer confidence. Photograph the product alone first, then again inside or beside the packaging to give shoppers a complete picture of the unboxing experience.
Small Details Matter More Than You Think
Close-up photography reveals everything. A fingerprint that is invisible to the naked eye becomes a visible smear when the image is magnified. A loose thread that seemed minor in person becomes the main subject in a fabric detail shot. The time spent preparing each product before the shoot saves editing time later and avoids situations where a buyer receives a product expecting it to match the photo exactly, only to notice imperfections that the image quietly hid.
Make Phone Photography Look More Professional
For many sellers, a smartphone is the only camera available — and that is completely fine. Modern smartphone cameras are capable of producing genuinely high-quality product images when used correctly. The limiting factor is almost never the phone itself; it is technique and setup.
Basic Phone Camera Settings to Know
- Turn on the grid overlay to help align products straight within the frame
- Tap on the product in the viewfinder to set correct focus before capturing
- Adjust exposure manually by sliding the brightness dial up or down after tapping to focus
- Lock focus and exposure simultaneously by pressing and holding the subject in most camera apps
- Always use the rear camera rather than the front-facing camera for higher image resolution
Stability and Consistent Framing
- Use a small tripod or prop the phone against a stable surface to eliminate hand-movement blur
- Shoot from a consistent distance for every product in the same category to keep images uniform
- Use the timer function or a Bluetooth shutter button to avoid touching the phone during capture
- Avoid extreme downward or upward angles unless the product category genuinely calls for it
What to Avoid With Phone Cameras
Never use digital zoom. Move the phone physically closer to the subject instead. Digital zoom degrades image quality significantly in ways that are obvious at any viewing size. Avoid built-in beauty modes or heavy filters that alter color and texture in ways that misrepresent the product. Most importantly, always shoot in the best available light rather than trying to rescue a dark image in editing — the result is always better when exposure is correct at the moment of capture.
Edit for Accuracy, Not for Tricks
Basic editing improves image quality and consistency. Aggressive editing that misrepresents the product, however, creates a dangerous mismatch between the listing image and what the buyer actually receives — which leads directly to returns, negative reviews, and damaged seller reputation over time. Edit to show the product at its best, not to show a version of it that does not exist.
What Good Editing Looks Like
- Crop and straighten — center the product, square it to the frame, and avoid accidental edge cuts
- Brightness and contrast — lift shadows slightly and improve overall clarity without overexposing
- White balance — adjust so the product color matches what you see in real life, not the camera’s interpretation
- Background cleanup — if using a white background, bring it to pure white to meet platform standards
- Remove sensor spots — small artifacts from the lens or sensor can be cloned out quickly in most apps
Free and Low-Cost Editing Tools for Sellers
- Snapseed (mobile) — free, capable, and easy to use for exposure and color correction
- Lightroom Mobile — the free tier is useful for applying consistent color settings across a batch
- Canva — good for background cleanup and resizing images to platform specifications
- Remove.bg — automated background removal that works reliably for clean product cutouts
- GIMP — free desktop editor for more detailed retouching work
Where Sellers Go Wrong With Editing
Over-saturation makes product colors look unrealistic. Heavy sharpening creates an artificial, over-processed look that sophisticated buyers immediately notice. Smoothing filters remove natural material texture and hide information the buyer needs to make a confident decision. The goal of every edit is for the final image to look exactly like the product would look if the buyer picked it up and examined it under good natural light — no better, no worse.
Build a Repeatable Photo Checklist for Every Listing
One of the biggest hidden costs in ecommerce content creation is inconsistency. When every product requires a different approach, every shoot takes longer and results vary unpredictably. A simple shooting checklist removes guesswork, speeds up content creation, and keeps images uniform across every listing in your catalog.
A Basic Product Photo Checklist
Before the shoot:
- Product cleaned, assembled, and checked for visible defects
- Background surface set up and free of dust or creases
- Lighting source positioned in the same location as the previous session
- Phone or camera charged, storage cleared, and settings confirmed
During the shoot:
- Capture all required angles: front, back, side, detail, and scale reference
- Review each image on screen for focus and exposure before moving the product
- Keep the product in the same position relative to the frame for consistent results
After the shoot:
- Sort and delete obvious rejects before spending time editing
- Apply consistent brightness, white balance, and cropping across all images
- Export at the correct file size and dimensions for the target platform
- Store edited images in a clearly labeled folder by product name or SKU
Batching for Efficiency
Shoot multiple products in the same session using the same setup. Grouping similar-sized items together means less time reconfiguring lights and backgrounds between products. The more products you can photograph in a single session, the lower your cost per image and the more uniform your catalog looks to shoppers browsing multiple listings at once.
Reviewing Your Images Against Competitor Listings
Before uploading, spend two minutes searching for your product type on the platform where you sell. Compare your images honestly against the listings ranking at the top of results. Look for whether your images are as bright and clear, whether competitors consistently include angles you are missing, and whether your background choice matches what the platform and buyers in your category expect. This quick competitive check is one of the most useful calibration exercises available to sellers at any level — it is free, takes almost no time, and often reveals gaps that would otherwise take months of underperforming listings to surface.
Great product photography does not happen by accident, but it also does not require expensive equipment or professional training. The sellers who consistently produce high-quality listing images do so because they apply a repeatable system — consistent lighting, clean backgrounds, complete angle sets, prepared products, and honest editing — every single time they shoot. Small improvements compound quickly across a growing catalog.
Each upgrade you make to your product images is a direct investment in listing performance. Better images mean more clicks, more informed buyers, fewer returns, and stronger long-term seller metrics on every platform. Pick one section from this guide today, implement it across your next batch of products, and build from there. The difference between your first attempt and your twentieth will be significant — and your listing results will reflect that progress clearly.